[[{“value”:”
Table of Contents
- Building a Streamlit Python UI for LLaVA with OpenAI API Integration
- Why Streamlit Python for Multimodal Apps?
- Configuring Your Development Environment
- Project Structure
- Building the Streamlit Python Frontend UI
- Demo: Multimodal Chat in Action with Streamlit Python
- How the OpenAI-Compatible API Integration Works
- Customizing the Streamlit Python UI for Your Use Case
- Summary
Building a Streamlit Python UI for LLaVA with OpenAI API Integration
In this tutorial, you’ll learn how to build an interactive Streamlit Python-based UI that connects seamlessly with your vLLM-powered multimodal backend. You’ll write a simple yet flexible frontend that lets users upload images, enter text prompts, and receive smart, vision-aware responses from the LLaVA model — served via vLLM’s OpenAI-compatible interface.
By the end, you’ll have a clean multimodal chat interface that can be deployed locally or in the cloud — ready to power real-world apps in healthcare, education, document understanding, and beyond.
This lesson is the last of a 3-part series on Deploying Multimodal LLMs with vLLM:
- The Rise of Multimodal LLMs and Efficient Serving with vLLM
- Setting Up LLaVA/BakLLaVA with vLLM: Backend and API Integration
- Building a Streamlit Python UI for LLaVA with OpenAI API Integration (this tutorial)
To learn how to build an interactive Streamlit Python UI that connects to your vLLM-powered multimodal API and handles image + text inputs, just keep reading.
Why Streamlit Python for Multimodal Apps?
As open-source vision-language models like LLaVA and BakLLaVA continue to evolve, there’s growing demand for accessible interfaces that let users interact with these models using both images and natural language. After all, multimodal models are only as useful as the tools we have to explore them.
Whether you’re a data scientist testing image inputs, a product engineer prototyping a visual assistant, or a researcher sharing a demo — having a quick, browser-based UI can save you hours of effort.
That’s where Streamlit shines.
What Is Streamlit Python?
Streamlit is an open-source Python framework designed to turn any Python script into a beautiful, shareable web app — with no front-end experience required.
With just a few lines of Python, you can go from a raw ML model to a full-fledged interactive application, complete with:
- File uploaders for images or documents
- Dropdowns to select models
- Real-time outputs (e.g., answers, captions, annotations)
- Charts, plots, metrics, and more
Here’s why Streamlit is so widely used in the ML community:
- Rapid Prototyping: Build and launch interactive tools in minutes.
- Modern UI Elements: Clean, responsive widgets like sliders, checkboxes, uploaders, and expandable panels.
- Rich Visualization Support: Natively integrates with Matplotlib, Plotly, Altair, PyDeck, etc.
- Backend Logic in Python: Define inference logic, connect to databases, or hit APIs without switching contexts.
- Flexible Deployment: Easily host your app on Streamlit Cloud, Hugging Face Spaces, or a private server.
If you’ve previously used Gradio (as we did in earlier tutorials), you’ll notice that:
- Gradio: is great for standardized demos and quick sharing.
- Streamlit: offers greater control over layouts, app flow, and state management — perfect for custom multimodal workflows.
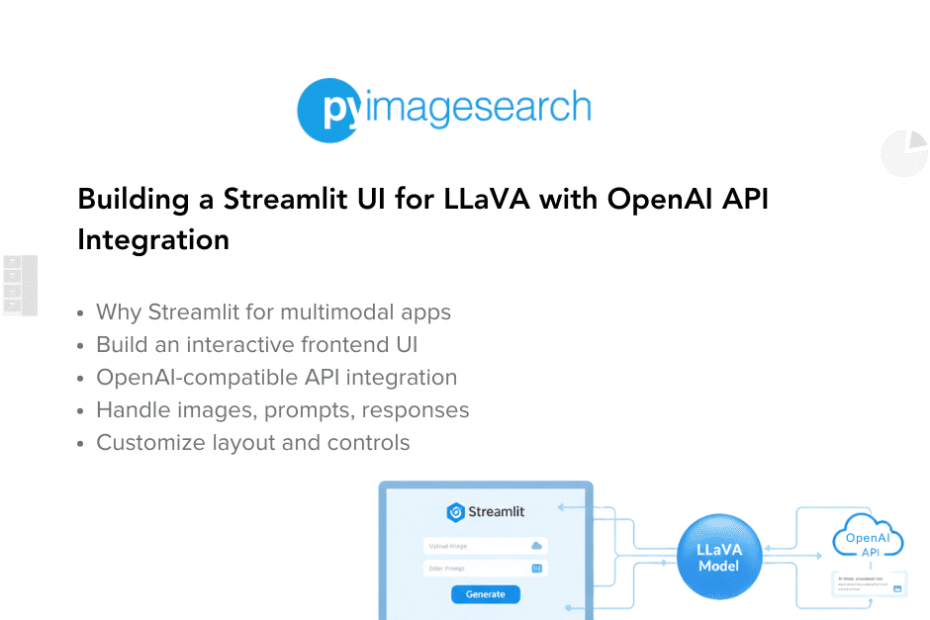
The Streamlit Python-Based UI We Will Build in This Lesson
Let’s take a look at what we’re building today — a Streamlit-powered multimodal chatbot UI connected to your vLLM backend.
This app includes:
- A dropdown to select supported models (e.g.,
llava-1.5-7b-hf) - A drag-and-drop file uploader for input images (JPEG, PNG — up to 200MB)
- A text input box for your image-related query
- A “Generate Response” button to trigger inference
- A live output panel displaying the model’s answer
With this simple UI, you can test LLaVA’s multimodal reasoning in real time — making it easier to evaluate performance, debug prompts, or build user-facing tools on top.
Such an interface isn’t just useful for demos — it can form the basis for:
- Internal QA tools for visual document understanding
- Educational image assistants
- Accessibility tools
- Research prototypes for image grounding tasks
Why Not FastAPI or Django?
Of course, you could build a custom UI using FastAPI or Django — but that would mean writing HTML templates, JavaScript frontends (e.g., with React or HTMX), and handling client-server state management manually.
Streamlit eliminates all of that with a clean, Python-first workflow tailor-made for machine learning developers.
So instead of stitching together FastAPI, React, and backend logic — we’ll build a powerful multimodal chat interface using just a few dozen lines of Python.
Configuring Your Development Environment
To follow this guide, you’ll need to install a few Python packages for working with images, interacting with your vLLM server, and building the Streamlit Python UI.
We recommend creating a new virtual environment before proceeding (e.g., using venv or conda) to avoid dependency conflicts.
Luckily, everything you need is pip-installable:
$ pip install streamlit pillow openai
To run the app, you’ll need a few core libraries. streamlit powers the UI, pillow handles image uploads, and openai is the client used to send prompts to the vLLM backend.
Once installed, verify Streamlit is working by running:
streamlit hello
You should see a sample app launch in your browser, confirming that everything’s good to go.
Need Help Configuring Your Development Environment?
All that said, are you:
- Short on time?
- Learning on your employer’s administratively locked system?
- Wanting to skip the hassle of fighting with the command line, package managers, and virtual environments?
- Ready to run the code immediately on your Windows, macOS, or Linux system?
Then join PyImageSearch University today!
Gain access to Jupyter Notebooks for this tutorial and other PyImageSearch guides pre-configured to run on Google Colab’s ecosystem right in your web browser! No installation required.
And best of all, these Jupyter Notebooks will run on Windows, macOS, and Linux!
Project Structure
We first need to review our project directory structure.
Start by accessing this tutorial’s “Downloads” section to retrieve the source code and example images.
From there, take a look at the directory structure:
llava-vllm-streamlit-demo/
├── streamlit_app.py              # Main Streamlit web application
├── requirements.txt              # Python package dependencies
├── README.md                    # Project documentation and setup guide
└── pyimagesearch/               # Core Python package
    ├── __init__.py              # Package initialization and exports
    ├── config.py                # Centralized configuration management
    ├── client.py                # LLaVA client wrapper for API interactions
    ├── image_utils.py           # Image processing and validation utilities
    ├── utils.py                 # General utilities and helper functions
    ├── test_chat_completion.py  # OpenAI-compatible API testing
    └── test_direct_api.py       # Direct vLLM server API testing
Let’s break down the purpose of each file in our organized project structure:
Main Application Files
streamlit_app.py: The primary web interface built with Streamlit that provides an interactive chat interface for users to upload images and ask questions about themrequirements.txt: Lists all Python dependencies needed to run the project, including Streamlit, OpenAI client, PIL for image processing, and more
The pyimagesearch Package
Our core functionality is organized into a proper Python package with clear separation of concerns:
__init__.py: Makes the directory a Python package and defines what gets imported when someone usesfrom pyimagesearch import ...config.py: Contains all configuration settings in one place, including:- Server URLs and API endpoints
- Model names and parameters
- Image processing settings
- UI configuration options
- Environment variable handling
client.py: Provides a unified interface for interacting with the LLaVA vLLM server:LLaVAClientclass that wraps both OpenAI-compatible and direct API calls- Error handling and retry logic
- Support for different model variants
- Automatic base64 image encoding
image_utils.py: Handles all image-related operations:- Processing uploaded Streamlit files
- Converting images to base64 format
- Image validation and format checking
- Resizing and optimization functions
utils.py: Contains general utility functions:- Server connectivity validation
- Model information retrieval
- Sample prompt generation
- Directory searching capabilities
Testing Modules
test_chat_completion.py: Tests the OpenAI-compatible/v1/chat/completionsendpointtest_direct_api.py: Tests the direct vLLM/generateendpoint
Building the Streamlit Python Frontend UI
Let’s walk through the full code for your Streamlit app that interfaces with the vLLM backend and supports multimodal inputs. We’ll break the code into logical chunks — from imports and layout to inference and response display — and explain each block clearly.
Importing Dependencies and Initializing the Client
import streamlit as st
import base64
from io import BytesIO
from PIL import Image

from openai import OpenAI

openai_api_key = "EMPTY"
openai_api_base = "http://10.11.145.21:8000/v1"
client = OpenAI(
    api_key=openai_api_key,
    base_url=openai_api_base,
)
We begin by importing the necessary libraries. streamlit powers our interactive UI, while base64, BytesIO, and PIL.Image are used to process and encode images before sending them to the backend.
We also import the OpenAI client from the official SDK, which will be used to communicate with our local vLLM server. By setting the base_url to your own vLLM-hosted endpoint, this client behaves exactly like OpenAI’s — but runs on your infrastructure. This abstraction simplifies integration while allowing full control.
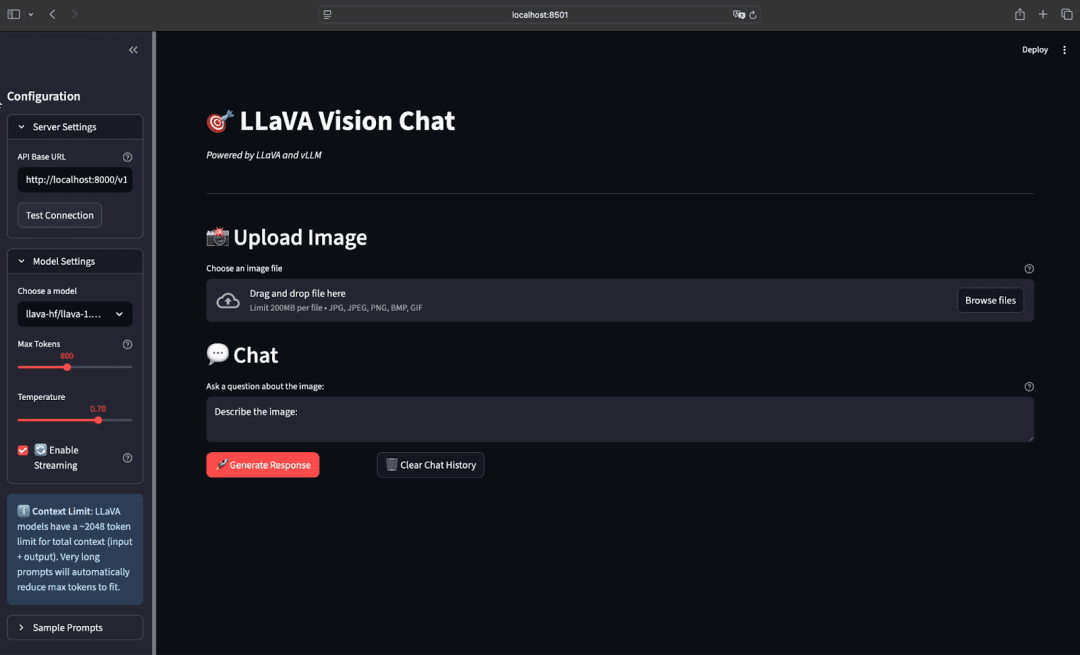
Configuring the App Layout and Model Selector
st.set_page_config(layout="centered")

st.title("Chat with Multimodal LLMs")
st.subheader("Using Streamlit + vLLM")

model = st.selectbox("Choose a model", ["llava-1.5-7b-hf"])
st.session_state["model"] = model

st.markdown("---")
This block configures the layout and visual hierarchy of the Streamlit interface. We opt for a centered layout for a clean, focused experience. The title and subheader clarify the app’s purpose, and a dropdown allows users to choose from the available multimodal models — currently only LLaVA-1.5-7B, but easily extensible. We also store the selected model in st.session_state so that the value persists even as the user interacts with the app.
Processing Uploaded Images
def process_image(uploaded_file):
    image = Image.open(uploaded_file)

    buffered = BytesIO()
    image.save(buffered, format="PNG")

    processed_image_b64 = "data:image/png;base64," + base64.b64encode(
        buffered.getvalue()
    ).decode("utf-8")

    return processed_image_b64
This helper function converts the uploaded image into a base64-encoded PNG string, which is the required format for multimodal inputs in OpenAI-compatible APIs. First, the uploaded image is opened using Pillow. Then it’s written into an in-memory buffer and encoded as a base64 string with a proper MIME prefix (data:image/png;base64,...). This allows us to send the image inline without saving it to disk or hosting it on a server — a clean and self-contained solution.
Handling File Upload and User Prompt
uploaded_file = st.file_uploader("Choose a file", type=["jpg", "jpeg", "png"])

if uploaded_file is not None:
    st.image(uploaded_file, caption="Uploaded Image", use_column_width=True)
    image_b64 = process_image(uploaded_file)

q = st.text_input("Ask a question about the image(s)")
if q:
    question = q
else:
    question = "Describe the image:"
This section enables users to upload an image and ask a question about it. Once an image is selected, it’s displayed using st.image() and then passed through the process_image() function.
Alongside the image upload, a text input field allows users to type their query. If no question is provided, we fall back to a default prompt — "Describe the image:" — to ensure the app still returns a response. This setup encourages exploration while handling edge cases gracefully.
Making the Inference Request and Displaying the Result
if st.button("Generate Response"):
    with st.spinner("Generating..."):
        res = client.chat.completions.create(
            model=f"llava-hf/{model}",
            messages=[
                {
                    "role": "user",
                    "content": [
                        {"type": "text", "text": question},
                        {"type": "image_url", "image_url": {"url": image_b64}},
                    ],
                }
            ],
            max_tokens=300,
        )

        st.chat_message("question").markdown(f"**{question}**", unsafe_allow_html=True)
        st.chat_message("response").write(res.choices[0].message.content)
Once the “Generate Response” button is clicked, the app sends a POST request to the vLLM backend using the OpenAI-compatible client. The messages payload includes both the text question and the image (as a base64-encoded URL). The server returns the model’s response, which we display as a conversational message.
st.spinner() gives the user feedback during processing, while st.chat_message() renders the interaction like a real chat app. This block ties everything together — turning local inference into a production-like user experience.
Demo: Multimodal Chat in Action with Streamlit Python
Now that we’ve walked through the code powering our Streamlit Python UI, let’s see the final app in action.
This demo shows the full workflow of interacting with our multimodal LLaVA model using the Streamlit frontend powered by vLLM:
- Upload an Image: Either drag and drop or use the file picker to load a JPEG or PNG image (up to 200MB).
- Ask a Question: Type a prompt about the image, such as “What’s happening in this picture?” or “Describe the scene.”
- Click “Generate Response”: The UI sends your question and image to the vLLM backend.
- Get an Answer: The multimodal LLM responds with a descriptive answer, shown immediately in the chat window.
Behind the scenes, the app:
- Uses
llava-1.5-7b-hfserved via vLLM - Sends requests through an OpenAI-compatible API interface
- Encodes the image using
PILandbase64 - Displays everything in a clean, responsive Streamlit Python UI
Whether you’re building a chatbot, a visual Q&A assistant, or a creative media analysis tool, this setup gives you a powerful starting point with just a few lines of Python.
How the OpenAI-Compatible API Integration Works
When you click “Generate Response” in the Streamlit Python UI, the backend interaction is handled by the following line of code:
res = client.chat.completions.create(...)
This call uses the openai Python SDK — but instead of sending the request to OpenAI’s official endpoint, it sends it to your locally hosted vLLM server. That’s possible because earlier in the script, you configured the OpenAI client with a custom base_url:
client = OpenAI(
    api_key="EMPTY",
    base_url="http://<your-vllm-ip>:8000/v1",
)
Even though the api_key is set to "EMPTY", it’s required by the SDK’s interface — and since vLLM doesn’t enforce authentication by default, you can use any placeholder.
What Happens Under the Hood?
When the .create() method is called:
- A POST request is sent to
http://<your-ip>:8000/v1/chat/completions - The payload includes:
- A model name like
"llava-hf/llava-1.5-7b-hf"— which must match the one you launched via vllm-serve - The
messagesarray: This contains both the user’s text prompt and the image input - A
max_tokenssetting to control response length
- A model name like
Here’s what a sample payload looks like (simplified for readability):
{
  "model": "llava-hf/llava-1.5-7b-hf",
  "messages": [
    {
      "role": "user",
      "content": [
        {"type": "text", "text": "What is happening in this image?"},
        {"type": "image_url", "image_url": {"url": "data:image/png;base64,..." }}
      ]
    }
  ],
  "max_tokens": 300
}
Why Base64 for Image?
vLLM expects the image to be embedded directly in the request, as a base64-encoded string wrapped in a data:image/...;base64,... format. This eliminates the need for separate upload endpoints or file servers.
Response Format
The response follows the OpenAI spec — it returns a choices list with a message.content field. This makes it easy to extract and display the assistant’s reply in your UI.
Customizing the Streamlit Python UI for Your Use Case
The UI we built in this lesson is minimal and functional — but Streamlit makes it easy to expand on this base and create a truly tailored user experience. Let’s walk through a few ways you can enhance your multimodal chat app:
Adding Temperature and Max Tokens Controls
You can give users control over generation behavior by adding sliders for temperature (controls randomness) and max tokens (limits response length):
temperature = st.slider("Temperature", 0.0, 1.0, value=0.7, step=0.1)
max_tokens = st.slider("Max Tokens", 50, 1000, value=300, step=50)
Then pass these values to your API call:
res = client.chat.completions.create(
    ...,
    temperature=temperature,
    max_tokens=max_tokens,
)
Supporting Multiple Image Inputs
Want to ask questions about a series of images? Replace the single-file uploader with:
uploaded_files = st.file_uploader("Upload images", accept_multiple_files=True)You can then loop over them to encode and send multiple base64 strings in the same prompt. Just ensure your vllm serve was launched with --mm-images-per-prompt set to the appropriate limit (default is 1).
Saving Chat History or Session Logs
If your app is part of a larger research or evaluation workflow, storing chat history can be helpful. You can easily add a session history container:
if "history" not in st.session_state:
    st.session_state.history = []

st.session_state.history.append((question, response))
This history can then be rendered, downloaded, or saved to a file or database.
Refining the Layout
You can fine-tune the UI layout with st.columns, tabs, or expanders to make the app more polished. For example:
col1, col2 = st.columns([1, 2])
with col1:
    st.image(uploaded_file)
with col2:
    st.text_input("Ask your question")
These are just a few enhancements to get you started. Streamlit’s flexibility means you can turn this prototype into a full-featured, production-grade interface — with just Python.
What’s next? We recommend PyImageSearch University.

86+ total classes • 115+ hours hours of on-demand code walkthrough videos • Last updated: September 2025
★★★★★ 4.84 (128 Ratings) • 16,000+ Students Enrolled
I strongly believe that if you had the right teacher you could master computer vision and deep learning.
Do you think learning computer vision and deep learning has to be time-consuming, overwhelming, and complicated? Or has to involve complex mathematics and equations? Or requires a degree in computer science?
That’s not the case.
All you need to master computer vision and deep learning is for someone to explain things to you in simple, intuitive terms. And that’s exactly what I do. My mission is to change education and how complex Artificial Intelligence topics are taught.
If you’re serious about learning computer vision, your next stop should be PyImageSearch University, the most comprehensive computer vision, deep learning, and OpenCV course online today. Here you’ll learn how to successfully and confidently apply computer vision to your work, research, and projects. Join me in computer vision mastery.
Inside PyImageSearch University you’ll find:
- ✓ 86+ courses on essential computer vision, deep learning, and OpenCV topics
- ✓ 86 Certificates of Completion
- ✓ 115+ hours hours of on-demand video
- ✓ Brand new courses released regularly, ensuring you can keep up with state-of-the-art techniques
- ✓ Pre-configured Jupyter Notebooks in Google Colab
- ✓ Run all code examples in your web browser — works on Windows, macOS, and Linux (no dev environment configuration required!)
- ✓ Access to centralized code repos for all 540+ tutorials on PyImageSearch
- ✓ Easy one-click downloads for code, datasets, pre-trained models, etc.
- ✓ Access on mobile, laptop, desktop, etc.
Summary
In this lesson, you built a full-fledged frontend for chatting with multimodal LLMs — powered entirely by Python and Streamlit.
You began by installing essential libraries (streamlit, Pillow, and the OpenAI-compatible SDK), then configured your app layout and connected it to a vLLM backend serving LLaVA via OpenAI-style endpoints. The interface enabled users to upload images, type questions, and view grounded responses — all through an elegant UI with dropdowns, file uploaders, and chat-style outputs.
You also saw a live demo of the complete workflow and explored how the frontend communicates with vllm serve behind the scenes — including how base URLs, model names, and image encodings are handled.
To help you go beyond the basics, we walked through several ways to customize the UI: adding sliders for temperature and max tokens, supporting multiple images, saving session history, and tweaking layout using Streamlit’s flexible APIs.
Together, this backend + frontend stack provides a powerful, production-ready foundation for building real-world multimodal applications — whether for accessibility, education, content analysis, or visual Q&A.
In upcoming lessons, we’ll continue expanding this UI with prompt templates, multi-turn conversation memory, and even LangChain integration for tool-augmented multimodal reasoning. Stay tuned!
Citation Information
Singh, V. “Building a Streamlit Python UI for LLaVA with OpenAI API Integration,” PyImageSearch, P. Chugh, S. Huot, A. Sharma, and P. Thakur, eds., 2025, https://pyimg.co/bcmp4
@incollection{Singh_2025_building-streamlit-python-ui-for-llava-w-openai-api-integration,
  author = {Vikram Singh},
  title = {{Building a Streamlit Python UI for LLaVA with OpenAI API Integration}},
  booktitle = {PyImageSearch},
  editor = {Puneet Chugh and Susan Huot and Aditya Sharma and Piyush Thakur},
  year = {2025},
  url = {https://pyimg.co/bcmp4},
}
To download the source code to this post (and be notified when future tutorials are published here on PyImageSearch), simply enter your email address in the form below!

Download the Source Code and FREE 17-page Resource Guide
Enter your email address below to get a .zip of the code and a FREE 17-page Resource Guide on Computer Vision, OpenCV, and Deep Learning. Inside you’ll find my hand-picked tutorials, books, courses, and libraries to help you master CV and DL!
The post Building a Streamlit Python UI for LLaVA with OpenAI API Integration appeared first on PyImageSearch.
“}]] [[{“value”:”Table of Contents Building a Streamlit Python UI for LLaVA with OpenAI API Integration Why Streamlit Python for Multimodal Apps? What Is Streamlit Python? The Streamlit Python-Based UI We Will Build in This Lesson Why Not FastAPI or Django? Configuring…
The post Building a Streamlit Python UI for LLaVA with OpenAI API Integration appeared first on PyImageSearch.”}]]  Read More Computer Vision, Multimodal LLMs, Streamlit, Tutorial, vLLM, base64 images, chat interface, computer vision, image question answering, inference demo, llava, multimodal llms, openai api, openai sdk, pillow, python, streamlit, tutorial, ui, vllm